Sunrise Soar II
Written by: David Gonzales IIProject Lead and Producer
Sunrise Soar II Team: David Gonzales II, Omar Mirza, Daniel Roper, Kevin Schmachtenberger, Mike Deep
Launch Date: 7 August 2010
Launch Time: 6:05 AM Central Time
Launch Location: San Marcos, TX
Mission Objectives:
- Capture high resolution images and high definition video of sunrise from the edge of space.
- Validate redundant tracking systems to ensure a good recovery.
- First test flight of the edge of space capsule PURSUIT.
Table of Contents:
Summary
On August 7th 2010, a team gathered in the predawn hours to launch a capsule called PURSUIT to the edge of space via high altitude balloon on a mission called Sunrise Soar II. PURSUIT flew to an estimated altitude of 80,000 feet and flew 30 miles downrange from the launch site in San Marcos, Texas before landing near Spring Branch, Texas. To our knowledge, Sunrise Soar II captured the highest resolution images of sunrise ever taken from the edge of space by a high altitude balloon flight. This is the detailed story of how it was done.
Edge of Space Capsule PURSUIT
Our project began with the construction of a new edge of space capsule named PURSUIT. The most critical aspect of any edge of space mission is recovery. Even if the flight goes perfectly, if you don't recover the hardware, you lose your chance to learn anything from it. We had learned this the hard way with the near loss of our previous capsule SOARER in a square mile of dense Texas hill country. SOARER had sent tracking information on descent, but overflew the coverage area at an altitude of 3,700 feet above the ground. The capsule was later discovered by a landowner and recovered a month and a half later. PURSUIT would have 2 independent tracking and data relay systems providing crucial redundancy for successful tracking and recovery.
The first tracking device selected was the Motorola i290 cell phone. A program called Instamapper was installed that allows the phone to provide both tracking and data relay. The program was configured so that it would transmit latitude, longitude, altitude, speed, and heading information every 5 seconds during the flight. The device uses the IDEN cellular network run by Sprint and Boost Mobile to communicate. When coverage isn't available, we configured the program to save the tracking data to transmit later when coverage became available. This cache was set to the maximum size. The phone was also configured using hidden menus to make the tracking program automatically launch in the background whenever the phone is powered on. This would make the start up process easier in the hectic minutes before launch. The program was also configured in the phone's hidden menus to become a "Permanent App" so that it could not accidently be shut down or interrupted. Real time tracking data could be viewed using the Instamapper website and plotted immediately to Google Maps.
The second tracking device chosen was the SPOT Generation 2 satellite messenger. This device is a personal locator beacon with the capability to provide GPS tracking data every 15 minutes for 24 hours at a time. It communicates using the Globalstar satellite constellation which means it has coverage nearly anywhere in the world. This capability was especially important for landing scenarios in which IDEN coverage was unavailable for the i290. Real time tracking data from the SPOT device could be viewed on the SPOT website and plotted to Google Maps. We could easily toggle between satellite, map view and topographic view to figure out the easiest route for capsule retrieval after the flight.
Ground testing for the tracking systems was especially crucial to ensure everything worked well. First, each tracking system was tested independently. Separate automotive tests driving known routes indicated that both tracking devices worked well with very high positional accuracy. Tests also confirmed that both tracking devices could work just six inches apart without interfering with one another. In tests, the i290 worked great as long as it had cellular service. The SPOT worked with good GPS reliability as well, however, some points were not always relayed due to blockage from the vehicle roof, buildings or trees. The Globalstar satellites passing overhead are always changing positions in the sky as they pass through their orbits. If the SPOT was left in one given location, the point was eventually relayed once a satellite had passed into a more favorable orientation.
Additional tests on the trackers were conducted to see if orientation had any effect on their ability to relay the critical location data for recovery. The antennas for satellite communication devices are highly directional and the antenna for the SPOT is no exception. Since the antenna was fixed in the body of the unit, we found that the SPOT worked reliably in about 4 out of 6 possible landing orientations. This was a concern since it might not be able to relay its location if the capsule landed in one of the unfavorable orientations.
To solve this problem, we came up with a suspension system for the SPOT to hang inside the capsule. A main line stretches through the center of the capsule and holds a second line attached the SPOT. Stoppers constructed from duct tape hold the second line and prevent it from sliding along the main line. With this suspension system, no matter what orientation the capsule lands in, the most favorable top side of the SPOT always hangs facing the sky. In ground tests, not a single data point was lost even with the capsule upside down, sideways or in other positions.

The airframe selected for PURSUIT was a large polystyrene cooler. It was strong, yet lightweight and large enough to accommodate the suspension orientation system needed for the SPOT. It had a large surface relative to its weight (low ballistic coefficient) which would help to slow the capsule during descent in the event of a parachute failure of some kind. The large size would also serve as an aid during recovery making spotting the capsule easier. The polystyrene would provide good insulation for the electronics. Temperatures at the edge of space can be as low as -60 degrees below zero Fahrenheit, and these frigid temperatures can cause batteries and electronics to fail on the vehicle. The cooler also acts as a cushion during touchdown to absorb energy and protect electronics during landing.
Chemical heating packs were also selected to fly within the capsule. These heating packs help fight off the cold and keep the electronics alive throughout the flight. They were affixed in direct contact with the cameras and a few inches away from the trackers. Since the heat packs contain metals, we didn't want to place them too close to the trackers to avoid GPS or transmission signal degradation. The heating packs are activated as soon as they are taken out of their airtight pouches. They contain iron which begins a catalyzed rusting reaction with oxygen from the atmosphere. Each pack provides about 8 hours of heat. An interesting effect occurs once the capsule reaches high altitude. Because there is very little oxygen at these high altitudes, little heat is produced by the packs. One might think this would be a problem, however when there is little air, there is little heat conduction. The inside of the capsule acts much like a thermos bottle and heat loss is fairly minimal. The heat built up in the packs during ascent is sufficient while at the edge of space. The heating packs actually provide most of their benefits in the mid-range altitudes during the ascent and descent, when the air is frigid, yet dense enough to quickly cool unheated hardware.
Metallic duct tape was used on the outside corners of the capsule in order to act as radar reflectors for any aircraft in the vicinity. It was also selected since it catches the sunlight and tends to glint when viewed at certain angles. This would make it easier to spot the vehicle on the ground during recovery. Care was taken not to use too much of this metallic tape so that it wouldn't interfere with GPS or telemetry signals from the trackers. Brightly colored orange duct tape was also placed on the outside of the capsule as a further aid to recovery. All tape for sealing the capsule prior to flight was also this bright orange color.
A red strobe light normally used for bicycle wheels was attached to the bottom of the capsule to increase visibility during the pre dawn ascent and further aid in recovery. It was affixed with the same main line used in the suspension orientation system for the SPOT. The line holds the SPOT on the inside of the capsule and passes through holes punched in the cooler to the outside of the capsule. It then runs through holes in the strobe light, holding it in place. It is tied off on the side of the capsule, holding everything in place. To make sure the line didn't tear through the polystyrene airframe, duct tape was used near the holes and corners for reinforcement.
A small personal alarm purchased from Radio Shack was also added on the outside top of the capsule as an aid to recovery. It acts as an audio locator beacon to help find the vehicle in high grass or vegetation. It emits a loud 100dB warbling alarm sound.
A parachute was purchased from Rocketchutes.com to bring PURSUIT safely down to earth after its flight to the edge of the atmosphere. These parachutes are normally used to bring down large amateur rockets after their flights. A bright cherry red parachute was selected for its high visibility. The parachute inflates up to 4 feet in diameter during descent.
Camera selection for both high resolution stills and HD video was one of the most important concerns for the mission. We began by selecting an HD digital video recorder. We wanted to choose a camera that recorded via flash memory. The selected video camera also needed to be as lightweight as possible for the best performance. After quite a bit of research, the Creative Vado HD was chosen to fly. It was small, lightweight, and had excellent low light performance. We would be launching about an hour before sunrise and wanted to capture city lights from above. The Vado also had a wider field of view than other cameras of comparable size and weight. It shoots HD video in 720p format. The progressive format was a plus, since it meant we could pull individual frames out of the video after the flight. The Vado came with a silicon case that flew to provide additional protection along with insulation against the harsh temperatures of the near space environment.
Once the camera arrived, we began the testing process. The built in viewing and editing software was moved off the camera's internal memory and onto a computer hard drive. This would ensure that the maximum amount of the camera's 8GB memory was available for the flight. After drilling out a hole in the polystyrene capsule to fit the Vado HD, we drove PURSUIT up to a high hill. There we confirmed that the slant the cooler provided would be perfect to capture primarily the earth from above, with enough of the sky to show the atmosphere tapering off into space.
We then began the important process of camera selection for the still images. We wanted to use a camera that was small, lightweight and had a wide field of view for capturing the curvature of the earth. We also needed a way to program the camera so that it would take images robotically throughout the duration of the mission. It was decided that the best way to accomplish this would be a software solution, since it wouldn't add any weight or additional mechanical complexity to the vehicle. An open source modified firmware called Canon Hack Development Kit (CHDK) is available for certain Canon cameras. Cameras running CHDK can be programmed to shoot images automatically at set intervals. We began by looking at the list of CHDK supported cameras and comparing their specifications with an emphasis on maximum field of view. After carefully considering all of our options, we decided that the Canon SD800 IS, sporting a wide field of view and CHDK compatibility, would be the best choice for the mission.
After the camera arrived, we purchased an 8GB SDHC memory card to ensure we had plenty of storage space for full resolution images. SDHC cards store images using solid state flash memory, which would work even in the near vacuum conditions at the edge of space. After selecting the proper CHDK build for the camera and firmware, we loaded the proper files onto the SDHC card. We next needed a way to program the camera so that it would take images non-stop until the battery died. We configured an intervalometer script so that the camera would automatically shoot images every ten seconds throughout the flight.
Ground testing of this camera was critical to ensure we got good results. Photographing the earth from the edge of space before, during and after the moment of sunrise is extremely difficult. Lighting conditions are constantly changing throughout the flight, from night to sunrise to full daylight. All of these changes occur in a matter of minutes. To add even more difficulty, the photographic capsule is constantly swaying and turning throughout the flight. This brings the sun into and out of the frame, causing a large variation in proper exposure depending on which way the camera is facing. Most high altitude missions fly when the sun is directly overhead during the day to avoid some of these difficulties. When the sun is directly overhead, the correct exposure for the Earth’s surface is nearly constant.
To deal with low light conditions, a camera’s automatic exposure programming tends to compensate by increasing the duration of the exposure (shutter speed). This allows the camera sensor more time to gather light for a proper exposure. The problem with this strategy is that it promotes motion blur with a spinning, swaying capsule and ruins the images. To solve the motion blur issue, we configured CHDK to lock the exposure duration to 1/800 of a second. Even with a rapidly spinning capsule, testing revealed that 1/800 of a second was enough to freeze movement. To deal with changing lighting conditions, the camera was set to automatically throttle the ISO sensitivity values between 80 and 800, a range of 4 1/3 stops, using the camera's metering. Using ISO values within this range ensured enough flexibility to compensate for changing lighting conditions without introducing the possibility of excessive noise at sensitivities over ISO 800.
The camera’s contrast detect autofocus works very poorly in low light conditions, so focus was locked in manual mode to infinity. As an additional measure for dealing with capsule spin, we wanted to take advantage of the camera's built in optical image stabilization (IS). IS can be locked to "Continuous", "Shoot Only" or "Off" by configuring parameters within CHDK. After testing, we decided that locking the IS to "Shoot Only" would help mitigate the effects of capsule spin without the excessive battery drain of "Continuous" mode.
In order to save power during the flight, a 3.5mm jack cut from of an old pair of headphones was plugged into the camera's A/V out port. The presence of a plug in the A/V port prompts the camera to shut off the LCD screen while the script still runs and takes photos, saving valuable battery life.
It took hours of ground testing with the script and imaging parameters before we found the above final settings. Experimentation was absolutely key. To ensure everything worked, we took the camera up to a high location and allowed it to shoot before, during and after sunset. The camera was also spun around fairly aggressively to simulate conditions analogous to the swaying capsule during flight. In a few tests, the camera was placed on a spinning platform to ensure the image was properly captured without camera motion blur.
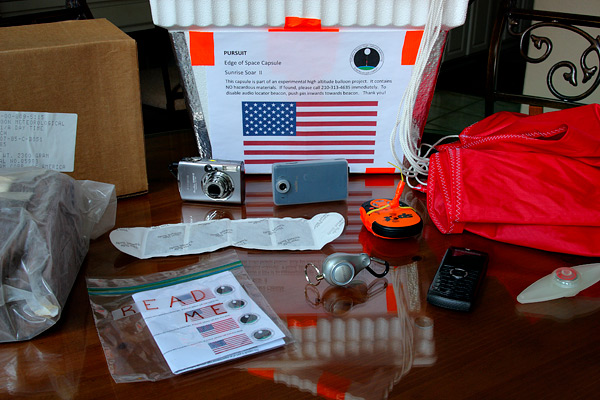
To most people, seeing PURSUIT on the ground after landing would be a strange and potentially concerning sight. It appears as a large, mysterious box complete with a blinking strobe light, red parachute, metallic/orange tape and obnoxiously loud alarm that just dropped out of the sky. If it landed in someone's yard, they could mistake it for a harmful device. It was important to put anyone at ease who might run across it before the recovery team arrived. We included a placard on the sides of the capsule with the following statement:
This capsule is part of an experimental high altitude balloon project. It contains NO hazardous materials. If found, please call 210-xxx-xxxx immediately. To disable audio locator beacon, push pin inwards towards beacon. Thank you!
The included placard also included the mission title, name of capsule, description of capsule, the US flag and a logo for amateur radio high altitude ballooning. In case the capsule was unable to relay tracking information, the placard also would allow someone stumbling upon it to call us so we could retrieve it. The most critical parts of the writing including the phone number were covered with transparent tape to provide some longer term weatherproofing. Miniature copies of the placard were also included inside PURSUIT and sealed in a plastic bag labeled "READ ME" as an additional weatherproof means of getting in contact with us if the capsule was found a long time after landing.
Launch Operations
With PURSUIT built and almost ready to fly, it was time to move on to the next phase of launch preparation. A couple of days before launch, we went over to an industrial gas supplier and picked up a 200 cubic foot tank of hydrogen. We had previously opened up an account with them and got pricing information for hydrogen purchase and tank rental. For safety, we secured the tank in the back of an open truck bed.
We also picked up a high purity gas regulator from a gas supplier called Air Liquide. Air Liquide was gracious enough to lend us the regulator for our flights so that we didn't have to buy an expensive one of our own. It is important that we used a proper regulator when dealing with hydrogen to minimize the chances of any hydrogen fire. We ensured that the proper CGA-350 fitting for hydrogen was attached. For flights with helium, a CGA-580 fitting is required.
We choose to fly using hydrogen over helium for a number of reasons. First of all, hydrogen is the least dense gas which allows us to reach higher altitudes over helium. Helium is also considered a strategic non-renewable resource. There are finite reserves of helium on earth which are produced only by radioactive beta decay underground. This helium is generally extracted as a byproduct during drilling for natural gas. Once the helium is gone, it is only replenished at an almost negligible rate. In contrast, hydrogen is the most abundant element in the universe and can be chemically extracted from a variety of plentiful sources on earth. It is also worth mentioning that the cost per cubic foot of hydrogen is about 1/4th the cost of helium. In terms of gas expenses, this means we could fly 4 missions for the cost of one helium mission. All of these factors contributed to our selection of hydrogen to go fly.
Since hydrogen does carry a flammability risk, we took a variety of precautions to ensure safety during the filling process. We acquired and carefully read the appropriate material safety data sheets (MSDS) on hydrogen. Other documents on safe handling of hydrogen were also acquired and read. On the morning of the flight, I briefed the crew about the risks of hydrogen and told everyone to speak up if they saw anything unsafe at any point during filling. We conducted filling at a slow rate to ensure that any risk of self ignition due to fast flow rates of hydrogen was mitigated. All valves on the regulator were opened/closed very slowly and exit pressures (PSI) were kept low. A few other factors also came into play during filling. We made sure to fill the balloon when it was still empty so that there would not be enough oxygen inside the balloon to support combustion. We also conducted filling outside so that any escaped hydrogen would quickly rise away and disperse. Most accidents with hydrogen have occurred when hydrogen escapes indoors and accumulates under the ceiling before finding a spark when a light is switched on or off. Also, since the climate around South Texas is very humid, this helps reduce any risk of a static discharge. All of these precautions and considerations helped ensure that safety during filling was top priority. If you are considering doing a launch of your own, make sure you do your research and keep safety first.
The launch balloon for Sunrise Soar II was a surplus meteorological balloon that was manufactured by Kaysam Industries back in the early 1980s for the US military. It arrived sealed in an airtight plastic bag. A few days before launch, the bag was opened and the balloon was unrolled and inspected to better understand how to fill it. It turns out that these balloons are filled from the top through a reinforced neck. A rubber stopper ball on a string is used to seal the balloon by lodging in the neck once the balloon is filled. There are 2 major portions to this balloon; the main balloon and a skirt section. The unpressurized skirt section is located on the bottom of the main balloon. The skirt has a number of large holes in it to equalize pressure between the inside and outside during ascent. This section distributes the load of the payload over a wide section of the pressurized balloon portion. A large spool of wound string comes attached to the bottom of the skirt section. This string is used to attach the payload to the balloon right before launch. With the balloon now well understood, the balloon was carefully repacked for the upcoming flight.
About a day before the flight, we began the final preparations to the electronics. All flight batteries were placed on their chargers to ensure they were full and ready to go. Fresh Energizer lithium batteries were installed in the SPOT. Lithium batteries work in extreme temperature ranges and provide steady voltage all the way until they die. Memory in the cameras was cleared after testing and the SDHC card was installed in the SD800. We also verified that all settings that could be set in advance on the trackers and cameras were correct.
We then began the process of choosing a launch site and looking at forecasts to see what the weather would do for the flight. It is important that the launch site be in an open area clear of trees or other high objects that the balloon could collide with on its way up. It is also important that surface winds be as low as possible. When filled, the balloon is about 7 feet in diameter and is very light. This means that the slightest breeze has an enormous surface to push against. This can make the balloon blow sideways or into the ground, popping it. We set 5 mph as the constraint for maximum allowable wind speed.
We had selected a launch time based on the local sunrise time. It is important to also take into account that the sun rises earlier at altitude than it does on the ground since the capsule is actually seeing further around the earth. We wanted to launch during night so that PURSUIT would have time to ascend before sunrise occurred at the edge of space.
We then began running flight predictions based on the GFS models provided by the National Weather Service. These models provide forecast wind data for various altitudes that the balloon will travel through on the way up and on the way down. For flight predictions, we used independent prediction software run by Near Space Ventures and Cambridge University. Both predictors showed good agreement for the flight tracks. These predictions indicated the expected path Sunrise Soar II would take in 3 dimensions. This information was plotted over maps, satellite images and topography maps by the flight prediction software. Using this information, we found that launching in San Marcos would provide the most favorable path and landing location in a rural area well North of San Antonio. One of the members of the launch crew noted that he knew of a good launch location at the top of a high parking garage at Texas State University. We had previously used this location to launch Sunrise Soar I a few weeks earlier. We made some calls to the campus police and received permission to use it as our launch site.
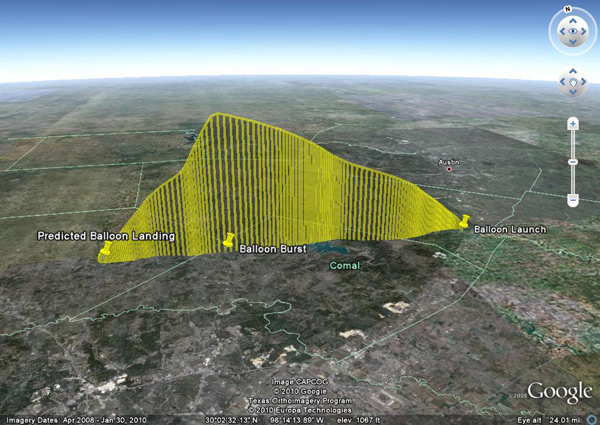
With the launch site pinned down, we began running additional flight predictions based on different altitudes the balloon might reach. There is a bit of uncertainty in the exact altitude at which the balloon will burst, since some balloons are manufactured more uniformly than others. For this reason, scenarios are calculated for a range of burst altitudes. The prediction software creates rings of probability for the landing locations. We confirmed that all scenarios would land in rural areas and run little risk of landing in a body of water, city or military facility. We also ensured that the predicted landing areas had IDEN cellular coverage for the i290 tracker.
With this done, we began gathering everything up that we would need for the early flight the next morning. This includes the balloon, capsule, electronics, chemical heating packs, parachute, duct tape, scissors, string, gas regulator, hydrogen tank, binoculars, weights, printed ground tracks, clipboard, pen, scale for lift, party balloons, etc. We also measured the final weight of the almost ready to fly PURSUIT and parachute to be 2.2lbs. Using this information and our desired rate of ascent, we were able to calculate our target amount of nozzle lift. Nozzle lift is a measure of lift directly at the bottom of the balloon once filled. It includes the weight of the capsule plus the amount of free lift for our desired ascent rate. This information along with our desired launch time was recorded and placed on the clipboard for reference during launch.
It was now time to wait. Everything had been checked, rechecked and checked again. We would need to leave San Antonio a little over 2 hours before launch. One hour would be spent driving, allowing about an hour for filling before launch. All the members of the launch crew went to try to get a few hours of sleep before our start at about 3:30 AM. I always have difficulty sleeping before launch as everything goes through your mind. So many things have to go perfect in order to have a successful flight and the details tugged at me. It is a nervous but intensely exciting feeling. I managed to get in a short nap before it was time to get up and go launch PURSUIT to the edge of space.
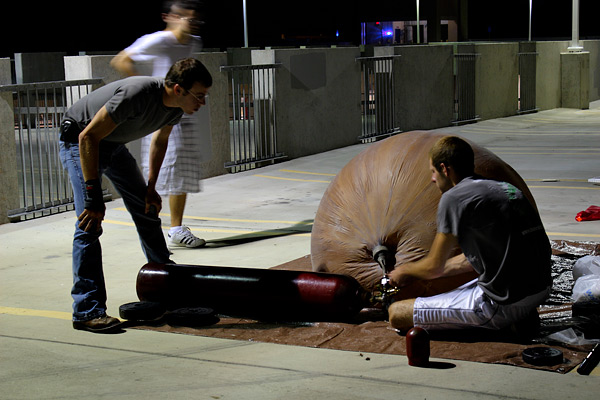
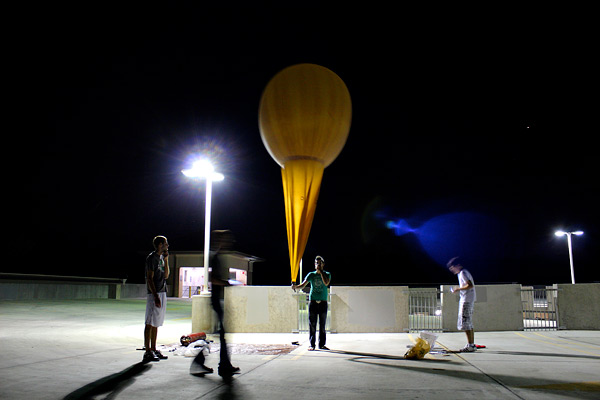
We arrived at the top of the Texas State University parking garage and selected a spot to get set up. It was still night, but lights on the garage meant everything was well lit. The tarp was laid out first and weights were used to hold it down securely. The tarp helps protect the delicate balloon during filling. Next, the hydrogen tank was carefully unloaded from the back of the truck bed and placed on the ground sideways. Care was taken to ensure that it couldn't roll away. The balloon was removed from its protective bag and unrolled with the filling end next to the tank. Another weight was placed on the skirt section to help hold the balloon down during filling.
Next, the safety cap on the hydrogen tank was removed and the regulator was installed. To begin filling, the end of the neck was placed over the output nozzle on the regulator. We made sure to tightly seal the neck over the output nozzle so that no gas could leak out. We started hydrogen gas flow slowly at first before gradually increasing it to a steady but safe level.
As filling continued, we began preparing the capsule for flight. The chemical heating packs were opened from their airtight containers and loaded inside. We unraveled the string from its spool and cut it about 10 feet below the bottom of the skirt. A small amount of tape was used near the cut to ensure that the string would not unravel. The top of the parachute was then tied to the line using several knots to make sure it could not come lose.
By this time, the balloon was beginning to gain some lift and one member of the crew held on to the skirt section to ensure it could not get away, taking the unactivated capsule with it. Two other members stayed at the nozzle section to monitor filling and make sure no twisting of the balloon occurred during inflation. At this point, the SPOT tracker was activated so it could begin acquiring GPS signals and tracking was initiated.
The balloon was now getting very large and we began using the spring scale to measure nozzle lift. For each measurement, the hydrogen flow was halted and the stopper ball was lodged into the throat of the balloon so that hydrogen could not escape. The balloon was removed from the filling nozzle and a string was used to attach it the spring scale. It was important to launch only when we had reached our target nozzle lift. The worst thing you can do is launch a balloon that only has enough lift to hold the payload. In these situations, the balloon can travel sideways a distance before colliding with something on the ground and creating a hazard. This is especially a concern with flammable hydrogen. When we saw that the lift was still too low, we never hesitated to reattach it and continue filling. After about three measurements, we reached and even slightly exceeded our target nozzle lift. The stopper ball was lodged in the throat and the end of the throat was folded up and secured firmly with duct tape. The balloon was ready to take PURSUIT up to the edge of space.
With the balloon ready to go, it was time to perform final close out of the capsule. This is a very hectic time, because once electronics are activated, their batteries begin diminishing and opportunities to capture imagery and videos from the air are instead spent on the ground. With the SPOT already transmitting tracking data, I activated the i290 and verified that the tracker started as it had been pre-programmed to do. I then switched on the Canon SD800 and switched on CHDK. The camera was then switched to manual mode and the focus was set to lock at infinity. The script was then activated and the camera began taking images at 10 second intervals. I then plugged the dummy jack into the camera’s A/V out port to disable the LCD screen. Next, I switched on the Vado HD camera and began recording.
We then began securing the cameras to the capsule using duct tape. We also attached heating packs directly against the backs of both cameras. In the process of doing so, I noticed that I was no longer hearing the shutter sound and beeps that the SD800 makes when the script is active taking images. In the hectic moments of the securing the cameras, someone had bumped a button and the script had halted. I pressed the button to retrigger the script and verified that it had restarted. Whew! One disaster averted. I then double checked the other electronics and noticed that the record button on the Vado had also been bumped during the taping process. I hit record again. Wow! Two disasters averted at the last minute. Confident that everything was running, we placed the lid on the top of the capsule and sealed it up. The strobe light on the bottom of the capsule was triggered next and began blinking. The pin on the audio locator beacon was pulled and began blaring away. PURSUIT was ready to fly!
As the capsule was being closed out, a small balloon was filled with hydrogen and tied off. We released it to see what direction the low level winds would carry the stack once it was released (The "stack" collectively consists of the high altitude balloon, the line, the parachute and the capsule). We were happy to see that the winds were blowing away from a nearby water tower as expected.
Foot by foot, we began letting the stack into the air until we reached the capsule. After one last quick look, the stack was released and PURSUIT soared into the cool predawn sky. The ascent rate was very fast and the balloon seemed to rocket straight on out. Everything up until release had been hectic, but it was relaxing to watch the balloon get smaller and smaller as it departed. All of the meticulous planning, coordination and work would now be put to the test as the fate of the balloon was left to the wind. The strobe made following it visually quite easy for some time. The audio locator beacon was still audible for a few minutes after release, warbling away. It surprised us how long we could hear it for. I wonder if any curious San Marcos residents heard it and looked to the sky that early morning? After about 10 minutes or so, we could no longer see the capsule.
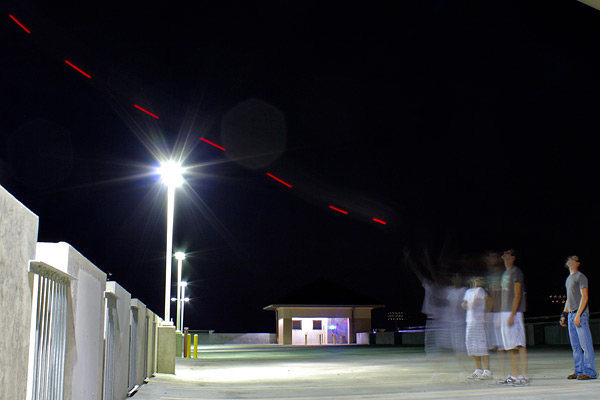
We carefully packed everything up and watched the sky gradually brighten. We watched the sun rise before leaving the launch site. It was partly cloudy that morning. The mid and high level clouds were complex and multilayered. I remember hoping that we would have some very unique images from the capsule!
Recovery
After launch, we stopped to for breakfast before heading back to San Antonio to view tracking data and prepare for recovery. The balloon rises at a steady ascent rate all the way until burst. The balloon will expand from about 7 feet in diameter at launch to more than 20 feet at the low pressures of the near space environment. Once the balloon expands to its breaking point, it bursts. This sends the capsule falling back towards earth. It falls very rapidly at first, since there is little air to slow it down or properly inflate the parachute. Once it reaches dense enough air, the parachute inflates and slows the descent rate. It floats down gently before making a touchdown and waiting to be recovered.
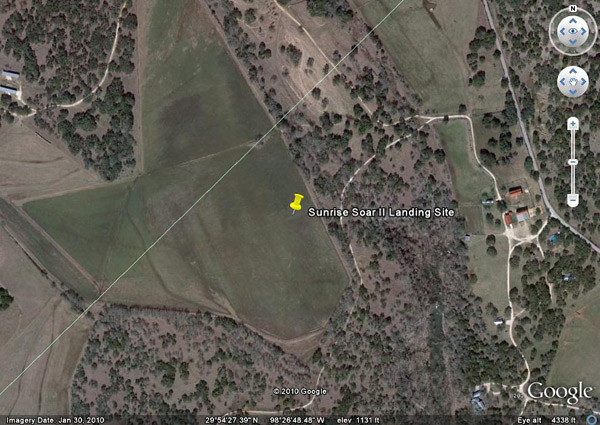
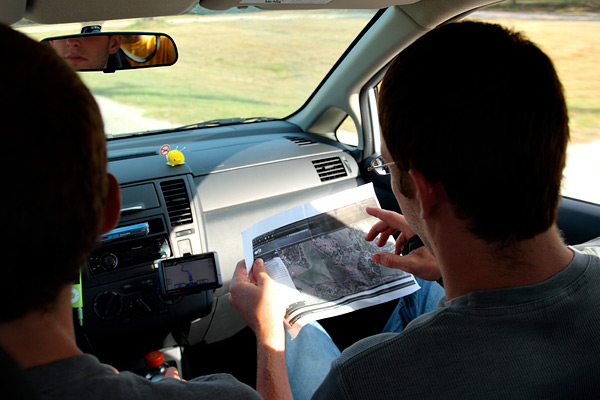
Upon arriving back in San Antonio, it had been about 2 hours since launch. We immediately saw tracking data coming from the SPOT satellite tracker. We saw that the 2 last points were coming from the same location. This meant that the capsule had just landed! It had come down near the town of Spring Branch, just 2 miles from the predicted landing spot (just a bit downrange from the predicted touchdown point for 80K feet) and well within the 5 mile radius ring. Based on all the data, it appeared that the capsule had flown to approximately 80,000 feet! According to satellite images, PURSUIT had come down right in a flat crop field just 0.28 miles from the nearest road. It had not landed in steep terrain or gotten stuck high on a tree. Recovery should be relatively straightforward! After printing out several different maps and satellite images, we plugged the coordinates into a GPS and hit the road. The atmosphere on the drive was one of excitement. We knew we had flown a great flight and knew exactly where PURSUIT was.
Approaching the point of landing, the road GPS unit took us on a bit of a side course into a subdivision as it tried to get us close. After consulting the maps we had printed, we were able to get back on course and find the ranch we were looking for. This particular ranch had a few barns visible on the satellite images with distinctive red roofs. These roofs were easy to spot from the road and we knew we were about a quarter mile away from the capsule. We had a new problem at this point, however. The road was separated from the ranch by an extra tall barbed wire fence meant to keep deer from jumping over. We pulled into the locked electronic gate entrance and noticed a keypad, however there was no intercom. We tried honking our horn to try to get the attention of anyone in the house just beyond the gate but there was no response. We decided to drive down the road a bit to see if we could get a hold of a neighbor when we noticed a convoy of vehicles approaching. As luck would have it, they turned right into the gate we had just been sitting at. We flagged down one of the vehicles and they told us to follow us through the gate and onto the ranch.
All of the vehicles parked and we got out. It turns out one of the convoy of vehicles belonged to a group of amateur cavers who were exploring and mapping out caves under local ranches. They were interested in what we were doing and got on the cell phone with the land owner. He told them that he would meet us shortly and we talked with the cavers as we waited. The friendly landowner soon arrived and told us he would go retrieve the capsule from the field. He took the map and drove out to the field to go retrieve it.
After about 30 minutes he came back and told us that he hadn't been able to find it. Had the tracker been putting out incorrect coordinates? I knew from testing that this had never occurred. I asked him if he wouldn't mind if had a look ourselves with our GPS. He told us that it was no problem and he even offered to drive us out on a bush hog with elevated seats.
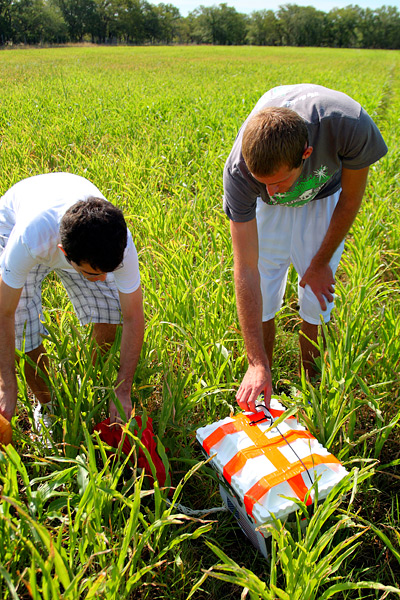
We climbed aboard and drove towards the field. As we drove along the edge of it, Daniel was able to spot something orange visible over the crop. We hopped out of the bush hog and approached. It was the capsule! The bright orange tape had done its job. PURSUIT, the parachute and a large portion of the burst balloon were all still attached and lay in the field. After carefully photographing how the stack had landed, we began inspecting everything. After falling from 80,000 feet and flying 30 miles downrange, there wasn't a scratch on PURSUIT. It had even landed top side up. We were surprised to find the parachute and lines tightly twisted up. The culprit soon was obvious. A larger than anticipated portion of the balloon had remained attached to the top of the chute along with the skirt section. Together these weighed approximately two pounds and had likely caused the chute to twist up. Thankfully everything looked to be in perfect condition after landing. This twisting chute had also bumped up against the audio beacon and pushed the pin inward, shutting it off. It was a huge relief to have recovered everything in great shape!
We picked everything up and drove over to where the cavers were preparing to enter a cave to show them. We opened up the capsule and found the i290 tracker had fallen lose from its mounted position. The i290 had been mounted using an industrial strength Velcro. The Velcro had actually held up but the "permanent" adhesive attaching it to the back of the tracking phone had failed. This likely had occurred in the cold conditions near the apex of the flight. The battery compartment door was also partially dislodged. We believe that after it had broken free at high altitude, the phone had tumbled inside the capsule and broken contact with the battery causing it to shut down. This explains why we didn't see tracking from the i290 on the way down, even though it had landed in a coverage area. We also noted that the still camera had partially dislodged from its hole. This most likely occurred during the impact of touchdown. Everything else was in perfect shape and the SPOT tracker was indicating that it was still tracking. Redundancy had saved the mission! After thanking and exchanging contact information with the land owner and cavers, we departed back for San Antonio to see how the cameras had performed.
Imagery and Video
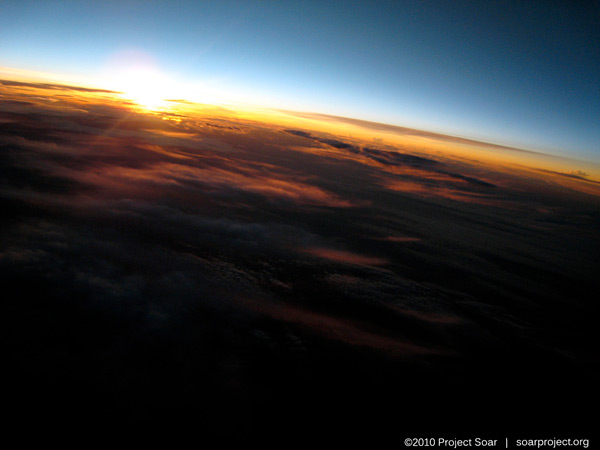
Upon returning from the recovery, we transferred the images and video from both cameras. The images from the still camera were absolutely breathtaking. The moment of sunrise is captured high above the clouds from the edge of space. It had been a perfect morning to fly; the mixture of complex clouds made many images appear as though the capsule was flying above an ocean of clouds. As the sun rose, it illuminated various cloud layers in a vibrant mixture of color. The curvature of the Earth is clearly visible along with the darkness of space. The photo set exceeded all of our expectations and are the highest resolution photos of sunrise from the edge of space ever taken by a high altitude balloon flight.
Once the balloon burst, the remnants can be seen in several images. In one of my favorite images, the backlit skirt section is seen hanging by a line from the top of chute. The capsule also captured its fall through multiple cloud layers. In other images, Canyon Lake is visible below. Cloud shadows and crepuscular rays (contrasting shadows and light beams cast behind clouds) can be seen converging on the anti-solar point (directly opposite from the sun) in a number of images. The sun shining through high clouds created some breathtaking scenes. The natural tendency of the capsule to rotate turned out to be advantageous, since it allowed photos to be taken pointing in many different directions throughout the flight. We even had enough shots to stitch together a three image panorama near the peak of the flight. There are also images after the capsule had landed in the crop field. All of the programmed camera parameters worked exceptionally well.
Video from the flight turned out to be interesting as well. It captures the moment of launch as PURSUIT soars out of the launch site at a great deal of speed. It also shows the city lights of San Marcos below as it climbed out. The sky can be seen to brighten off the West during the ascent. Unfortunately, condensation developed during the ascent and prevented sharp video from being taken at the peak of the flight. For some time, the lights of San Antonio far below can be seen. They form a pattern very similar to the famous city lights from space images. One of the most interesting things from the video is how the sound of the audio locator beacon changes during ascent. It begins as a loud rapidly warbling alarm but chimes with decreasing frequency and volume as PURSUIT climbs. As the air grows colder it cools the electronics and batteries causing the changes. By the time the capsule was about halfway up the alarm is barely audible before stopping altogether in the extreme cold. One can also hear interesting events in the flight such as when the adhesive holding the i290 fails causing the i290 to fall. The sound of the balloon bursting is also captured at the peak of the flight. Recording on the Vado ended as the battery expired on the way down as expected.
Overall, the mission was an outstanding success and met or exceeded all of the primary objectives for the flight. We successfully launched, tracked and recovered the capsule. We also learned a great deal from this flight that will help future flights. PURSUIT flew to an estimated altitude of 80,000 feet and flew 30 miles downrange from the launch site in San Marcos, Texas before landing near Spring Branch, Texas. To our knowledge, Sunrise Soar II captured the highest resolution images of sunrise ever taken from the edge of space by a high altitude balloon flight.